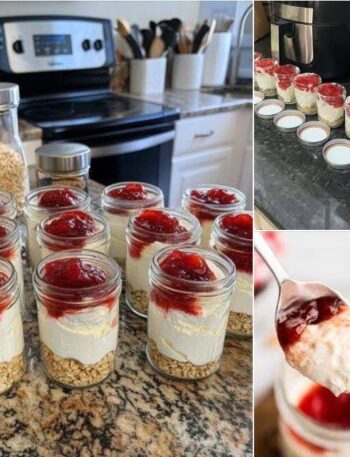
High Protein Blueberry Cheesecake Jar RecipeThis High Protein Blueberry Cheesecake Jar is a creamy, fruity, and satisfying dessert designed for anyone who wants something sweet while keeping protein in the spotlight. It combines a buttery graham cracker base, a smooth vanilla cheesecake layer, and a bright blueberry topping for a dessert that feels indulgent without requiring a traditional oven-baked cheesecake.The individual jars make this recipe especially convenient. Each portion can be prepared separately, covered, and stored in the refrigerator, making these cheesecake jars useful for meal prep, afternoon snacks, post-workout treats, or a simple dessert after dinner.The creamy layer gets its texture from Greek yogurt and light cream cheese, while vanilla protein powder adds extra protein and a pleasant vanilla flavor. Fresh or frozen blueberries create a naturally fruity topping that balances the richness of the cheesecake layer with a little acidity and sweetness.Best of all, there is no complicated water bath, no crust to bake, and no waiting for a full cheesecake to cool. Everything is assembled in individual containers and chilled until ready to enjoy.1. Why You’ll Love This RecipeThere are several reasons these blueberry cheesecake jars are worth making:
High in protein compared with many traditional desserts
No traditional baking required
Easy to prepare in individual portions
Creamy, crunchy, and fruity in every bite
Great for meal preparation
Convenient for busy mornings or afternoons
Easy to customize with different fruits
Attractive enough for parties and gatherings
Can be made with fresh or frozen blueberries
Requires simple ingredients
Easy to store in the refrigerator
The combination of textures is one of the best parts. You get a crunchy biscuit base, a soft vanilla cheesecake filling, and a juicy blueberry topping in every spoonful.2. Preparation Time and ServingsPrep Time: About 20 minutes Cooking Time: About 5 minutes for the blueberry topping Chilling Time: At least 2 hours Total Time: Approximately 2 hours 25 minutes Yield: 4 cheesecake jarsThe majority of the total time is chilling time, so you can prepare the jars ahead and leave them in the refrigerator until you are ready to serve them.3. IngredientsFor the Crumb Base
1 cup graham cracker crumbs or crushed light digestive biscuits
2 tablespoons melted unsalted butter or coconut oil
1 tablespoon honey or pure maple syrup
For the Protein Cheesecake Layer
1 cup plain nonfat Greek yogurt
½ cup light cream cheese, brought to room temperature
1 scoop vanilla protein powder
2 tablespoons pure maple syrup or liquid stevia, adjusted to taste
1 teaspoon vanilla extract
2 tablespoons unsweetened almond milk, only if needed
For the Blueberry Topping
1½ cups fresh or frozen blueberries
1 tablespoon lemon juice
1 tablespoon chia seeds or cornstarch
1 tablespoon honey or pure maple syrup
2 tablespoons water
4. Equipment NeededYou only need basic kitchen equipment:
Four clean glass jars or dessert glasses
Medium mixing bowl
Small mixing bowl
Small saucepan
Spoon or spatula
Whisk or electric hand mixer
Measuring cups and spoons
Small rolling pin or food processor for crushing biscuits
Small jars with lids are particularly convenient if you plan to prepare the cheesecake jars for later.5. Prepare the JarsBegin by washing four small glass jars thoroughly.Make sure the jars are completely dry before adding any ingredients. Moisture inside the jars can affect the texture of the crumb layer.Place the empty jars on a clean tray or countertop. Arranging them together makes it easier to divide the ingredients evenly.If you plan to transport the desserts, jars with secure lids are the best option.6. Make the Crunchy Biscuit BasePlace the graham crackers or digestive biscuits into a sealable food bag.Crush them using a rolling pin until they become fine crumbs. You can also use a food processor if you prefer a more uniform texture.Transfer the crumbs to a mixing bowl.Add the melted butter or coconut oil and honey or maple syrup.Stir thoroughly until the crumbs are evenly coated. The mixture should resemble slightly damp sand and should hold together when pressed.If the crumbs appear extremely dry, make sure the butter has been distributed evenly before adding additional ingredients.7. Build the First LayerDivide the crumb mixture evenly between the four jars.Use the back of a small spoon to press the crumbs firmly into the bottom of each jar.You do not need to compress the crumbs extremely hard. Pressing them firmly enough to create an even layer is sufficient.Once the bases are finished, set the jars aside while preparing the creamy filling.8. Prepare the Protein Cheesecake FillingPlace the room-temperature cream cheese into a medium mixing bowl.Add the Greek yogurt.Using an electric hand mixer or sturdy whisk, blend the ingredients until the mixture becomes smooth and creamy.Take your time with this step. Any remaining lumps of cream cheese will be noticeable in the finished dessert.Once the mixture is smooth, add the vanilla protein powder, maple syrup or liquid stevia, and vanilla extract.Mix again until all the ingredients are thoroughly combined.The mixture should have a creamy consistency that is thick enough to sit on top of the biscuit layer.9. Adjust the Cheesecake ConsistencyDepending on the Greek yogurt, cream cheese, and protein powder you use, the filling may be thicker than expected.If it is difficult to spoon or spread, add 1 tablespoon of unsweetened almond milk and mix.If necessary, add another tablespoon.Avoid adding too much liquid because the cheesecake filling should remain thick and creamy rather than runny.Taste the filling and adjust the sweetness if needed.Different protein powders have different levels of sweetness, so you may need slightly more or less sweetener depending on the product you use.10. Add the Creamy LayerSpoon the cheesecake mixture evenly over the biscuit bases.Try to divide the filling equally between the four jars so each serving has a similar amount.Use the back of a spoon or a small spatula to smooth the surface.You can also gently tap each jar against the countertop to help settle the filling and remove large air pockets.At this point, the jars should have a clear crunchy bottom and creamy white middle layer.11. Prepare the Blueberry ToppingPlace a small saucepan over medium heat.Add the blueberries, lemon juice, honey or maple syrup, and water.If you are using frozen blueberries, there is no need to thaw them first.Cook the mixture gently for approximately 3–5 minutes, stirring occasionally.As the blueberries heat, they will begin to soften and release their colorful juices.Use the back of your spoon to gently crush some of the berries if you want a thicker, more jam-like topping while leaving some berries whole for texture.12. Thicken the Blueberry SauceReduce the heat to low.Add the chia seeds or cornstarch.If using cornstarch, mix it properly so that it does not form noticeable lumps. Continue stirring as the mixture thickens.Cook for another couple of minutes until the blueberry mixture becomes glossy and thicker.If using chia seeds, allow the mixture a little additional time to thicken as the seeds absorb liquid.Remove the saucepan from the heat.Most importantly, allow the blueberry topping to cool before placing it over the cheesecake layer.Hot blueberry sauce can soften the creamy layer and affect the finished texture.13. Add the Blueberry LayerOnce the blueberry mixture has cooled to room temperature, divide it between the four jars.Gently spoon the fruit mixture over the cheesecake layer.Spread it carefully so the blueberry topping covers the surface without mixing too much into the cream.The contrast between the white cheesecake layer and deep purple-blueberry topping creates an attractive presentation.14. Chill the Cheesecake JarsPlace the lids on the jars and transfer them to the refrigerator.Chill for at least 2 hours.This resting time allows the crumb base to firm up and gives the cheesecake layer a colder, more structured consistency.For the best texture, prepare the jars earlier in the day and allow them to chill until dessert time.15. Serving SuggestionsServe the jars directly from the refrigerator.For extra decoration, add a few fresh blueberries to the top immediately before serving.You can also add:
Extra biscuit crumbs
Fresh lemon zest
Sliced almonds
A few mint leaves
Fresh strawberries
Unsweetened coconut flakes
Add toppings immediately before serving so crunchy ingredients maintain their texture.16. Tips for the Best Cheesecake JarsUse Room-Temperature Cream CheeseSoft cream cheese blends much more easily with Greek yogurt. Cold cream cheese can create small lumps.Don’t Overcook the BlueberriesThe goal is to soften the fruit and create a thick topping, not completely evaporate all the liquid.Cool the Fruit Before AssemblyAllowing the blueberry mixture to cool prevents it from warming or loosening the cheesecake layer.Taste Before Filling the JarsProtein powders and sweeteners vary significantly in flavor. Taste the cheesecake mixture before dividing it among the jars and make small adjustments if necessary.Keep the Layers EvenDividing each component equally gives every jar a consistent combination of crust, cheesecake filling, and fruit.17. Easy Fruit VariationsBlueberries are delicious, but you can easily change the fruit topping.For a strawberry cheesecake jar, replace the blueberries with chopped strawberries.For a raspberry version, use fresh or frozen raspberries and follow the same basic cooking process.For a mixed berry dessert, combine blueberries, raspberries, and blackberries.For a peach version, use finely diced peaches and a little lemon juice.You can also combine strawberries and blueberries for a colorful berry cheesecake jar.18. Make It Extra CrunchyIf you enjoy different textures, add a crunchy topping just before eating.Try:
Toasted sliced almonds
Chopped walnuts
Extra graham cracker crumbs
Toasted coconut
Chopped pecans
For the best texture, keep crunchy toppings separate until serving rather than storing them on the cheesecake overnight.19. Storage InstructionsKeep the cheesecake jars refrigerated and covered.They are best enjoyed within approximately 3–5 days, depending on the freshness of the ingredients and your food-storage practices.If using jars with lids, make sure they are properly sealed before placing them in the refrigerator.Do not leave dairy-based cheesecake jars at room temperature for extended periods.20. Why This Recipe Can Be a High-Protein DessertTraditional cheesecake often relies heavily on cream cheese, sugar, butter, and a baked crust.This recipe takes a different approach by incorporating Greek yogurt and protein powder into the cheesecake layer.Greek yogurt provides protein and a creamy consistency, while protein powder increases the protein content of the dessert.The exact amount of protein will depend on the Greek yogurt and protein powder brands you choose. Always check the nutrition labels if you are tracking your daily protein or carbohydrate intake.21. Approximate NutritionThe supplied recipe provides the following estimated nutrition per serving:
Calories: 260 kcal
Protein: 22 g
Carbohydrates: 28 g
Dietary Fiber: 4 g
Total Sugars: 14 g
Total Fat: 6 g
Saturated Fat: 3 g
Calcium: 180 mg
These numbers are estimates and can change considerably depending on the type of biscuits, protein powder, yogurt, cream cheese, sweetener, and other ingredients used.22. Frequently Asked QuestionsCan I use frozen blueberries?Yes. Frozen blueberries work very well. Add them directly to the saucepan and cook until they soften and release their juices.Can I make these cheesecake jars ahead?Absolutely. They are particularly convenient for advance preparation. Make the jars, cover them, and refrigerate until you are ready to serve.Can I use regular cream cheese?Yes. Regular cream cheese can be substituted for light cream cheese, although the calorie and fat content will be different.Can I make the recipe without protein powder?Yes, but removing protein powder will reduce the protein content and may change the consistency. You may need to adjust the amount of yogurt or sweetener.Can I use another milk?Yes. Unsweetened dairy milk or another suitable unsweetened milk can be used if you need to loosen the cheesecake filling.How long should the jars chill?At least two hours is recommended. A longer chilling period can produce a firmer, colder dessert.23. Final Recipe CardHigh Protein Blueberry Cheesecake JarsYield: 4 jars Prep Time: 20 minutes Cooking Time: 5 minutes Chill Time: 2 hours Total Time: About 2 hours 25 minutesIngredientsBase:
1 cup graham cracker crumbs or crushed light digestive biscuits
2 tablespoons melted unsalted butter or coconut oil
1 tablespoon honey or maple syrup
Cheesecake layer:
1 cup plain nonfat Greek yogurt
½ cup light cream cheese, softened
1 scoop vanilla protein powder
2 tablespoons maple syrup or liquid stevia
1 teaspoon vanilla extract
1–2 tablespoons unsweetened almond milk, if needed
Blueberry topping:
1½ cups blueberries
1 tablespoon lemon juice
1 tablespoon chia seeds or cornstarch
1 tablespoon honey or maple syrup
2 tablespoons water
Directions
Prepare and dry four small jars.
Crush the graham crackers or digestive biscuits into fine crumbs.
Mix the crumbs with melted butter and honey.
Divide the mixture between the jars and press it gently into the bottoms.
Beat softened cream cheese and Greek yogurt until smooth.
Add protein powder, sweetener, and vanilla.
Mix until creamy and uniform.
Add almond milk if the filling is too thick.
Divide the cheesecake mixture between the four jars.
Cook blueberries, lemon juice, sweetener, and water in a saucepan for 3–5 minutes.
Add chia seeds or cornstarch and cook briefly until thickened.
Cool the blueberry topping completely.
Spoon the blueberry mixture over each cheesecake layer.
Cover the jars and refrigerate for at least 2 hours.
Garnish with fresh berries or other toppings immediately before serving.
Serve chilled and enjoy.
24. Final ThoughtsThese High Protein Blueberry Cheesecake Jars offer a delicious way to enjoy the flavors of cheesecake in a convenient individual dessert. The crunchy biscuit base contrasts beautifully with the creamy vanilla filling, while the homemade blueberry topping adds fruity sweetness and vibrant color.The recipe is simple enough for everyday meal preparation but attractive enough for guests. Preparing several jars at once also means you can have a ready-to-eat dessert waiting in the refrigerator whenever you want something sweet.For the best results, use softened cream cheese, avoid adding too much liquid to the cheesecake layer, allow the blueberry topping to cool completely, and give the finished jars enough time to chill.Copyright note: This article has been rewritten in original wording and structure based on the recipe information you provided. It is not a verbatim copy of the supplied source.