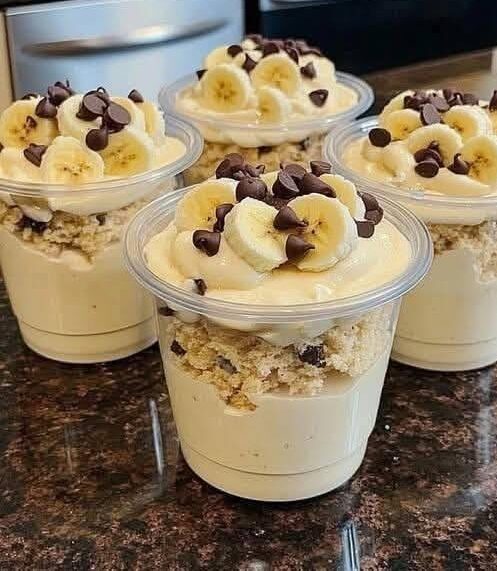
Few desserts evoke comfort quite like banana pudding. With its silky custard, fresh banana slices, and light whipped topping, this timeless favorite has earned a place on family tables for generations. Traditional recipes are often loaded with refined sugar, sweetened condensed milk, and sugary cookies, creating a rich dessert that many people enjoy only on special occasions. This sugar-free banana pudding offers a fresh approach by preserving the classic creamy texture and delicious banana flavor while reducing added sugar.
Rather than simply removing sugar, this recipe carefully balances naturally sweet ripe bananas, a sugar-free sweetener, rich dairy, and vanilla to create a dessert that tastes indulgent without relying on refined sugar. Every ingredient contributes to flavor, texture, and stability, producing a pudding that is smooth, satisfying, and easy to prepare at home.
Whether you’re following a lower-sugar lifestyle, preparing dessert for someone watching their sugar intake, or simply looking for a healthier version of a classic favorite, this recipe delivers excellent results without sacrificing taste.
Why You’ll Love This Recipe
This sugar-free banana pudding has several advantages over traditional recipes:
- No refined sugar.
- Naturally sweetened with ripe bananas.
- Smooth, creamy homemade custard.
- Rich vanilla flavor.
- Light and fluffy whipped topping.
- Easy to prepare with everyday ingredients.
- Perfect for meal prep.
- Great for family gatherings and celebrations.
- Delicious served chilled.
- Customizable with different toppings.
The result is a comforting dessert that feels rich and satisfying while containing significantly less added sugar than the classic version.
Preparation Information
Preparation Time: 30 minutes
Cooking Time: 20 minutes
Chilling Time: 4 to 6 hours
Total Time: Approximately 6 hours
Difficulty Level: Moderate
Yield: 6 to 8 servings
Ingredients
For the Custard
- 2 cups whole milk
- 1 cup heavy cream
- 4 large egg yolks
- 2 tablespoons cornstarch
- ½ cup granulated erythritol or monk fruit sweetener
- 1 tablespoon pure vanilla extract
- ¼ teaspoon salt
Banana Layer
- 4 to 5 ripe bananas, sliced
- 1 additional ripe banana, mashed (optional for extra flavor)
Whipped Cream Topping
- 1 cup heavy whipping cream
- 1 to 2 tablespoons sugar-free sweetener
- ½ teaspoon vanilla extract
Optional Crunch Layer
Choose one:
- Almond flour crumble
- Sugar-free vanilla cookies
- Chopped almonds
- Chopped walnuts
- Unsweetened coconut flakes
Choosing the Best Bananas
Bananas are the heart of this recipe, so selecting the right ones makes a noticeable difference.
Look for bananas with yellow peels covered in small brown spots. At this stage, much of the starch has naturally converted into sugar, creating a sweeter and more flavorful fruit.
Avoid green bananas because they are firm, less sweet, and slightly starchy. Completely black bananas can also work, but they become extremely soft and may create overly mushy layers.
Perfectly ripe bananas provide:
- Better sweetness
- Stronger banana flavor
- Softer texture
- Better blending into the custard
Step 1: Prepare the Dry Ingredients
In a medium bowl, combine:
- Cornstarch
- Sugar-free sweetener
- Salt
Whisk everything together thoroughly.
Mixing these dry ingredients first prevents lumps from forming once they are added to the warm milk.
Step 2: Prepare the Egg Mixture
Place the egg yolks into another bowl.
Add about ¼ cup of the milk.
Whisk until completely smooth.
This small amount of milk loosens the yolks, making them easier to combine with the hot dairy later.
Step 3: Heat the Dairy
Pour the remaining milk into a saucepan.
Add:
- Heavy cream
- Vanilla extract
Warm over medium heat.
Do not allow the mixture to boil.
Instead, heat until steam begins to rise and tiny bubbles appear around the edge of the pan.
Gentle heating keeps the dairy smooth and prevents scorching.
Step 4: Create the Custard
Slowly whisk the cornstarch mixture into the warm milk.
Continue whisking until fully dissolved.
Next, gradually pour a small amount of the hot milk into the egg yolks while whisking continuously.
Repeat this process several times.
This gradual warming process is called tempering and prevents the eggs from cooking too quickly.
Once warmed, pour the egg mixture back into the saucepan.
Cook over medium-low heat.
Whisk constantly.
Within several minutes the custard will begin to thicken.
The finished custard should coat the back of a spoon while remaining smooth and silky.
Avoid overcooking, as excessive heat can cause the eggs to curdle.
Step 5: Add the Banana Flavor
Remove the saucepan from the heat.
If using mashed banana, stir it into the warm custard until completely combined.
The mashed banana blends into the pudding, creating a naturally sweet flavor throughout every spoonful.
For an ultra-smooth texture, briefly blend the custard using an immersion blender.
Allow the custard to cool for about 15 minutes before assembling.
Step 6: Whip the Cream
Pour the heavy whipping cream into a chilled mixing bowl.
Add:
- Sugar-free sweetener
- Vanilla
Beat until medium peaks form.
The whipped cream should be soft, fluffy, and easy to spread.
Avoid whipping too long, or it may become grainy.
Step 7: Assemble the Pudding
Choose a glass serving dish, trifle bowl, or individual dessert glasses.
Spread a layer of custard across the bottom.
Arrange sliced bananas evenly over the custard.
Add another layer of custard.
Continue alternating layers until all ingredients are used.
Finish with a generous layer of whipped cream.
If desired, sprinkle the top with:
- Chopped nuts
- Coconut flakes
- Almond crumble
- Crushed sugar-free cookies
The layers create beautiful presentation while ensuring every serving includes creamy custard and fresh bananas.
Step 8: Chill
Cover the dish with plastic wrap or an airtight lid.
Refrigerate for at least 4 hours.
For the very best flavor and texture, chill overnight.
As the pudding rests:
- The custard becomes firmer.
- Banana flavor deepens.
- The layers settle together.
- The dessert becomes easier to slice and serve.
Patience is rewarded with a noticeably richer flavor.
Step 9: Serve
Remove the pudding from the refrigerator about 10 minutes before serving.
This slight warming allows the custard to soften just enough for the smoothest texture.
Serve chilled using a large dessert spoon.
Each serving should contain creamy custard, fresh banana slices, airy whipped cream, and a bit of crunch if you’ve added a topping.
Helpful Tips for Success
- Use ripe bananas with brown speckles for maximum sweetness.
- Whisk the custard constantly to prevent lumps.
- Never boil the milk mixture.
- Temper the eggs slowly.
- Allow the custard to cool slightly before adding banana slices.
- Chill thoroughly before serving.
- Use cold equipment when whipping cream.
- Assemble the pudding the same day it will be chilled for the freshest banana flavor.
Common Mistakes and How to Avoid Them
Watery Custard
Cause:
- Insufficient cooking time.
- Too little cornstarch.
Solution:
Continue cooking gently until the custard thickens enough to coat a spoon.
Grainy Texture
Cause:
- Eggs overheated.
Solution:
Cook over medium-low heat and whisk continuously.
Not Sweet Enough
Cause:
- Bananas were not fully ripe.
Solution:
Choose bananas with plenty of brown spots or slightly increase the sugar-free sweetener.
Overly Sweet
Cause:
- Too much sugar substitute.
Solution:
Start with the lower amount and adjust after tasting the custard.
Mushy Bananas
Cause:
- Very overripe fruit.
Solution:
Use ripe but still firm bananas for the sliced layers.
Flavor Variations
You can personalize this pudding in many ways.
Try adding:
- Cinnamon for warmth.
- Nutmeg for extra depth.
- Unsweetened cocoa powder for a chocolate version.
- Espresso powder for a mocha twist.
- Peanut butter swirled into the custard.
- Toasted pecans for crunch.
- Fresh berries for a fruity variation.
- Lemon zest for brightness.
Each variation creates a unique dessert while preserving the creamy banana base.
Storage Instructions
Store covered in the refrigerator.
The pudding stays fresh for up to 3 days.
It tastes best during the first 48 hours, when the bananas are at their freshest and the custard has the ideal texture.
Freezing is not recommended because bananas release moisture as they thaw, which can make the pudding watery and affect its consistency.
Nutritional Benefits
Compared with a traditional banana pudding, this version offers several advantages:
- No refined sugar.
- Lower added sugar.
- Good source of calcium from milk.
- Potassium from bananas.
- Protein from eggs and dairy.
- Rich, creamy texture without sweetened condensed milk.
- Flexible enough to fit many lower-sugar eating plans.
Although bananas naturally contain sugar, they also provide fiber, vitamins, minerals, and a rich banana flavor that reduces the need for additional sweeteners.
Serving Suggestions
This pudding pairs wonderfully with:
- Fresh strawberries
- Blueberries
- Raspberries
- Toasted almonds
- Chopped pecans
- Unsweetened shredded coconut
- Fresh mint leaves
- A light dusting of cinnamon
- Sugar-free chocolate shavings
Serve it at family dinners, summer picnics, birthdays, holiday celebrations, or simply as a make-ahead dessert for the week.