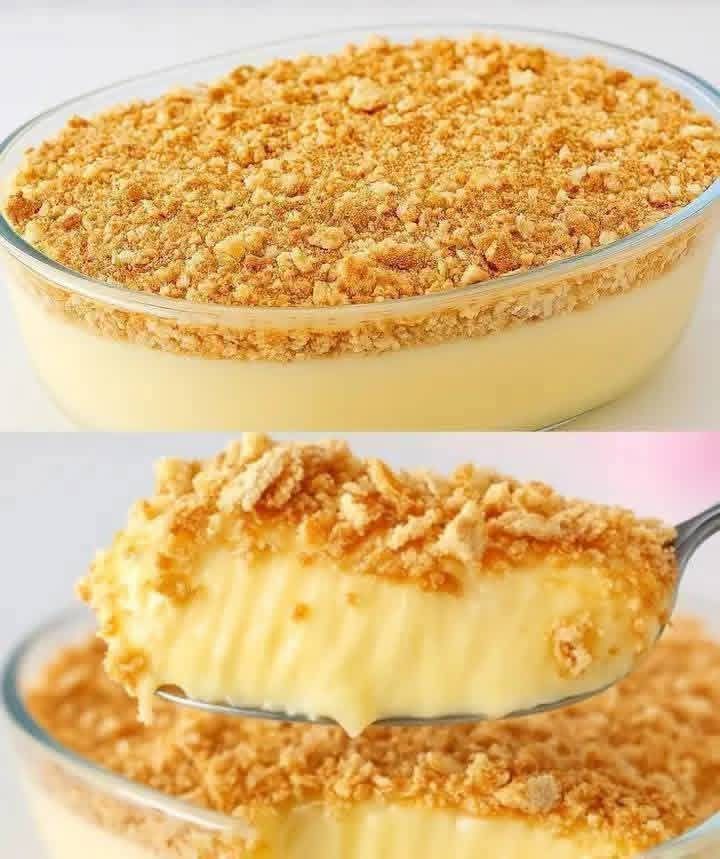
When it comes to quick homemade desserts that are creamy, comforting, budget-friendly, and incredibly easy to prepare, few recipes compare to a classic no-bake biscuit custard pudding. This chilled layered dessert combines silky vanilla custard, sweet condensed milk, and soft biscuit layers into a rich and satisfying treat that tastes like something straight from a bakery display case.
The beauty of this dessert lies in its simplicity. You do not need an oven, complicated baking tools, or expensive ingredients to create a delicious dessert everyone will love. Using pantry staples like milk, cornstarch, biscuits, vanilla, and condensed milk, you can prepare a smooth and luxurious pudding that feels elegant while remaining beginner-friendly.
This creamy refrigerator dessert is ideal for every occasion. Whether you are preparing a quick family dessert after dinner, making a make-ahead sweet dish for a party, or searching for an easy Eid dessert recipe, this layered biscuit pudding is always a crowd-pleaser.
As the dessert chills, the crunchy biscuit layers slowly absorb moisture from the custard and soften into delicate cake-like layers. The top remains slightly crisp, creating the perfect contrast between creamy and crunchy textures.
This no-bake biscuit custard dessert is known by many names around the world. Some people call it biscuit pudding, while others refer to it as an icebox cake, layered custard dessert, biscuit trifle, or refrigerator pudding. No matter what name you use, the result is always delicious.
With its rich vanilla flavor, creamy consistency, and soft biscuit texture, this homemade chilled dessert quickly becomes a favorite recipe that people make again and again.
Why No-Bake Desserts Continue to Trend
Easy no-bake desserts have become extremely popular because they save time, require minimal effort, and deliver satisfying results without complicated baking techniques.
Unlike traditional baked desserts, chilled pudding recipes are convenient and stress-free. There is no need to monitor oven temperatures or worry about overbaking. Everything comes together in a simple layering process before the dessert chills in the refrigerator.
This creamy biscuit pudding recipe is especially loved because it offers:
- Quick preparation
- No oven required
- Affordable ingredients
- Creamy texture
- Make-ahead convenience
- Beginner-friendly instructions
- Family-friendly flavor
- Elegant presentation
It is one of the easiest desserts for both beginner cooks and experienced home bakers.
The Magic of Homemade Custard
The heart of this dessert is the smooth vanilla custard. Homemade custard creates the luxurious creamy texture that makes every spoonful rich and comforting.
Unlike instant pudding mixes, homemade custard delivers deeper flavor and a fresher texture. It also allows you to control the sweetness and consistency more easily.
A properly prepared custard should be:
- Smooth
- Creamy
- Velvety
- Rich
- Thick enough for layering
- Light enough to melt in the mouth
When chilled with biscuit layers, the custard transforms into an irresistible dessert filling that tastes soft, silky, and refreshing.
Why Cornstarch Is Perfect for Custard Pudding
Cornstarch is the ingredient responsible for thickening the milk mixture into a stable custard.
As the milk heats, the starch molecules absorb liquid and expand, creating a pudding-like texture without the need for eggs.
Cornstarch offers several advantages:
- Smooth consistency
- Easy preparation
- Stable layers
- Glossy appearance
- Clean flavor
- Beginner-friendly technique
Because this dessert uses cornstarch instead of eggs, the custard remains light and easy to prepare while still tasting rich and creamy.
Importance of Continuous Whisking
One of the most important steps when preparing homemade custard is constant whisking.
Stirring continuously helps:
- Prevent lumps
- Stop scorching
- Create silky texture
- Ensure even thickening
Medium heat works best because high heat can cause uneven cooking and may burn the milk at the bottom of the pan.
A gentle cooking process creates the smoothest and most luxurious pudding texture.
Choosing the Best Biscuits for Layered Pudding
This dessert is highly versatile because it works with many types of plain biscuits and cookies.
The best options include:
- Digestive biscuits
- Graham crackers
- Marie biscuits
- Tea biscuits
- Vanilla cookies
- Plain butter biscuits
These biscuits absorb moisture beautifully while still maintaining structure between the custard layers.
As the pudding chills, the biscuits soften into delicate cake-like layers similar to classic icebox cakes.
Why Sweetened Condensed Milk Makes This Dessert Special
Sweetened condensed milk is one of the key ingredients that gives this pudding its rich and creamy flavor.
Because condensed milk is concentrated, it adds sweetness and body without needing additional cream.
Benefits of condensed milk include:
- Rich dairy flavor
- Smooth consistency
- Creamy texture
- Caramel-like sweetness
- Luxurious mouthfeel
It blends perfectly into the custard and helps create a dessert that tastes indulgent while using simple ingredients.
The Role of Vanilla in Dessert Recipes
Vanilla may seem like a small ingredient, but it dramatically improves flavor.
Good-quality vanilla adds:
- Warm aroma
- Bakery-style flavor
- Sweet depth
- Creamy balance
Vanilla enhances the milk and condensed milk while complementing the biscuit layers beautifully.
Vanilla bean paste can also be used for stronger flavor and visible vanilla specks.
Optional Butter for Extra Creaminess
Although optional, butter adds incredible richness to the custard.
When stirred into the hot pudding mixture, butter melts smoothly and creates:
- Silky texture
- Glossy finish
- Rich taste
- Creamy mouthfeel
Even a small amount of butter can make the dessert taste more luxurious.
Why This Dessert Is Perfect for Summer
During warmer months, many people prefer chilled desserts over baked sweets.
This no-bake biscuit pudding is especially refreshing because it is served cold directly from the refrigerator.
Benefits during hot weather include:
- No oven heat
- Cooling texture
- Light creamy consistency
- Refreshing serving temperature
It is ideal for summer dinners, Ramadan desserts, Eid celebrations, and weekend gatherings.
How Chilling Improves the Dessert
Refrigeration is not just for cooling the dessert — it is essential for developing flavor and texture.
As the pudding chills:
- The custard thickens further
- The biscuits soften
- Flavors blend together
- Layers stabilize
- Texture improves
For best results, overnight chilling is recommended.
The dessert becomes even creamier and more flavorful after several hours in the refrigerator.
Easy Ways to Customize This Dessert
One reason this chilled custard biscuit dessert remains so popular is its flexibility.
You can easily customize it with different flavors and toppings.
Cinnamon Biscuit Pudding
A light dusting of cinnamon between the layers adds warmth and bakery-style aroma.
Cinnamon pairs beautifully with vanilla custard.
Chocolate Biscuit Custard Dessert
Chocolate lovers can add cocoa powder or melted chocolate to the custard.
Chocolate shavings on top create an elegant finish.
Coffee-Flavored Icebox Pudding
A small amount of instant coffee dissolved into the custard creates a delicious coffee dessert with café-style flavor.
Coconut Custard Biscuit Dessert
Shredded coconut adds tropical flavor and extra texture.
It works especially well as a topping.
Fruit Layered Custard Dessert
Fresh fruits like bananas or strawberries pair beautifully with vanilla custard.
Fruit layers add freshness and color.
Best Tips for Perfect Biscuit Custard Pudding
Use Full-Fat Milk
Whole milk creates the richest custard texture and best flavor.
Low-fat milk may produce a thinner consistency.
Stir Continuously
Constant whisking prevents lumps and keeps the custard smooth.
Cool Slightly Before Layering
Allowing the custard to cool briefly prevents the biscuits from becoming overly soggy too quickly.
Spread Layers Evenly
Uniform layers improve both appearance and texture.
Even layering also helps create cleaner slices when serving.
Chill Thoroughly
At least 2 hours of chilling is necessary.
Overnight refrigeration produces the best flavor and consistency.
Why This Dessert Is Perfect for Entertaining
This pudding looks elegant despite being extremely easy to prepare.
Its layered appearance makes it ideal for:
- Family dinners
- Birthday parties
- Eid gatherings
- Potluck events
- Tea parties
- Holiday desserts
- Weekend treats
Because it is served chilled in a dish, it also travels well for gatherings and celebrations.
Creative Serving Ideas
There are many beautiful ways to serve this dessert.
Individual Dessert Cups
Layer the pudding in small serving glasses for parties or formal gatherings.
This creates elegant individual portions.
Family-Style Dessert Dish
Serve the pudding in a large glass baking dish for casual family meals.
The visible layers create a bakery-style presentation.
Elegant Toppings
Finish the dessert with:
- Crushed biscuits
- Cocoa powder
- Cinnamon dusting
- Chocolate curls
- Fresh berries
- Caramel drizzle
- Whipped cream
- Chopped nuts
These toppings add flavor, texture, and visual appeal.
Storage Instructions
This dessert stores beautifully in the refrigerator.
Refrigerating
Cover tightly and refrigerate for up to 4 days.
The flavors continue improving as the dessert rests.
Freezing
Freezing is not recommended because it may affect the custard texture and soften the biscuits excessively after thawing.
Common Mistakes to Avoid
Overheating the Custard
Too much heat can scorch the milk or create lumps.
Cook over medium heat while whisking continuously.
Skipping Refrigeration Time
The pudding needs time to fully set and develop texture.
Using Overly Sweet Cookies
Plain biscuits work best because condensed milk already adds significant sweetness.
Uneven Layering
Take your time spreading each layer evenly for better presentation.
Nutritional Benefits of Dairy-Based Desserts
Although this dessert is indulgent, milk-based recipes also provide nutrients such as:
- Calcium
- Protein
- Vitamin D
- Potassium
When enjoyed in moderation, it becomes a comforting homemade treat that satisfies sweet cravings beautifully.
Why Everyone Loves This No-Bake Custard Dessert
This creamy layered biscuit pudding combines everything people love in homemade desserts:
- Rich vanilla flavor
- Creamy custard texture
- Soft biscuit layers
- Crunchy topping
- Easy preparation
- No baking required
- Budget-friendly ingredients
It feels nostalgic, comforting, and satisfying while remaining incredibly simple to prepare.
Whether served at a family dinner, shared during celebrations, or enjoyed quietly with tea or coffee, this dessert always delivers warmth and comfort in every bite.
Once you make it, there is a good chance it will become one of your favorite easy no-bake dessert recipes for every season.
Part 2: Easy No-Bake Biscuit Custard Pudding Recipe
Creamy Layered Vanilla Biscuit Dessert
Preparation Time
- Prep Time: 15 minutes
- Chilling Time: 2 hours
- Total Time: About 2 hours 15 minutes
Servings
Serves 6–8
Ingredients
Custard Filling
- 3 cups (700ml) whole milk
- 1 can (14 oz) sweetened condensed milk
- 4 tablespoons cornstarch
- 1 teaspoon vanilla extract
- 1/4 cup butter (optional for extra richness)
Biscuit Layers
- 2 packets digestive biscuits or graham crackers
- Extra crushed biscuits for topping
Optional Flavor Additions
- Light cinnamon dusting
- Cocoa powder
- Crushed nuts
- Chocolate shavings
Instructions
Step 1: Prepare the Custard
In a saucepan, combine:
- Whole milk
- Sweetened condensed milk
- Cornstarch
Whisk thoroughly until completely smooth and lump-free.
Place over medium heat and cook while stirring continuously for about 5–7 minutes until the mixture thickens into a creamy custard.
Remove from heat.
Stir in vanilla extract.
Add butter if using and mix until fully melted and smooth.
Step 2: Create the Biscuit Base
Crush half the biscuits into fine crumbs using a rolling pin or food processor.
Spread a thin layer into the bottom of a deep serving dish or glass baking dish.
Step 3: Add the First Custard Layer
Pour half the warm custard mixture over the biscuit layer.
Spread evenly using a spoon or spatula.
Step 4: Add Another Biscuit Layer
Sprinkle another generous layer of crushed biscuits over the custard.
This creates delicious texture between the layers.
Step 5: Finish with Remaining Custard
Pour the remaining custard mixture over the biscuit layer.
Smooth the top evenly.
Step 6: Add Final Toppings
Sprinkle extra crushed biscuits across the surface.
Optional toppings include:
- Cocoa powder
- Cinnamon
- Chocolate shavings
- Chopped nuts
Step 7: Chill Until Set
Place the dessert in the refrigerator for at least 2 hours.
For the best flavor and texture, chill overnight.
Serve cold.
Helpful Tips
- Stir the custard constantly to avoid lumps.
- Use whole milk for richer texture.
- Overnight chilling creates the best consistency.
- Add extra biscuit layers for a taller dessert.
- Serve in dessert cups for parties.
Serving Suggestions
This chilled dessert pairs wonderfully with:
- Hot coffee
- Chai tea
- Fresh fruit
- Whipped cream
- Chocolate drizzle
Storage Instructions
Refrigerator
Store covered for up to 4 days.
Freezing
Freezing is not recommended because it may affect the texture of the custard and biscuits.