Prep Time: 20 minutes
Rise Time: 35–50 minutes
Cook Time: 45–55 minutes
Total Time: About 2 hours
Servings: 10 slices
Cuisine: International
Difficulty: Easy
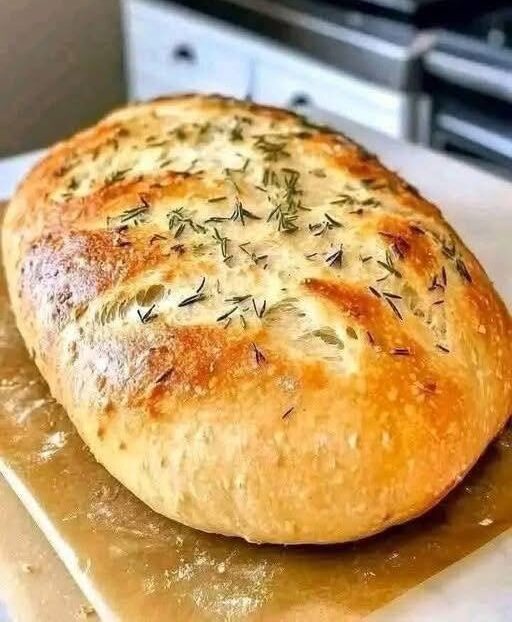
There is nothing quite like the aroma of freshly baked bread filling your kitchen. Many people believe gluten-free bread is difficult to make, but this recipe proves otherwise. With a few simple pantry ingredients and an easy mixing method, you can bake a soft, fluffy loaf that is perfect for breakfast, sandwiches, or serving with your favorite meals.
Unlike traditional wheat bread, gluten-free bread doesn’t require kneading. Instead, the ingredients are mixed into a thick batter that rises once before baking. This makes the process much simpler and less time-consuming while still producing a delicious loaf with a tender crumb and golden crust.
Whether you’re following a gluten-free lifestyle because of dietary needs or simply looking to try homemade gluten-free baking, this recipe is beginner-friendly and delivers consistent results every time.
Why You’ll Love This Recipe
- Easy to prepare with simple ingredients
- No kneading required
- Soft texture with a light crumb
- Perfect for toast and sandwiches
- Freezes beautifully
- Great for beginners
- Uses common kitchen equipment
- Delicious fresh or toasted
What Makes Gluten-Free Bread Different?
Traditional bread relies on gluten to create a stretchy dough that traps air during rising. Since gluten-free flour doesn’t contain gluten, the bread behaves differently from the beginning.
Instead of forming a firm dough, the mixture becomes a thick batter. This batter is poured directly into a loaf pan where it rises before baking. Understanding this difference is the key to successful gluten-free bread.
Avoid adding extra flour even if the batter seems sticky. The higher moisture content helps create a softer loaf after baking.
Ingredients
- 3 cups gluten-free all-purpose flour blend (with xanthan gum or guar gum)
- 2 tablespoons sugar or honey
- 2 teaspoons instant yeast
- 1 teaspoon salt
- 2 tablespoons milk powder (optional)
- 1¼ cups warm water
- 3 tablespoons olive oil or vegetable oil
- 2 large eggs, room temperature
- 1 tablespoon apple cider vinegar (optional)
Ingredient Notes
Gluten-Free Flour Blend
Choose a quality gluten-free flour blend that already contains xanthan gum. These blends usually include rice flour and starches that help create structure and improve texture.
Yeast
Fresh instant yeast produces the best rise. If your yeast does not foam during activation, replace it before continuing.
Sugar or Honey
Besides adding mild sweetness, sugar feeds the yeast and helps it activate properly.
Eggs
Eggs provide structure, moisture, and richness while helping the loaf hold together after baking.
Oil
Oil keeps the bread soft and prevents it from drying out too quickly.
Apple Cider Vinegar
Although optional, vinegar can improve the bread’s rise and create a lighter crumb.
Kitchen Equipment
Before starting, gather the following equipment:
- Large mixing bowl
- Small bowl
- Measuring cups
- Measuring spoons
- Whisk
- Electric mixer or sturdy spoon
- 9×5-inch loaf pan
- Parchment paper
- Rubber spatula
- Clean kitchen towel
- Wire cooling rack
Step-by-Step Instructions
Step 1: Activate the Yeast
Pour the warm water into a small bowl.
Add the sugar or honey and stir until dissolved.
Sprinkle the yeast over the top.
Allow the mixture to sit for 5–10 minutes.
If the yeast is active, a layer of bubbles and foam will appear on the surface.
If no bubbles develop, discard the mixture and begin again with fresh yeast.
Step 2: Mix the Dry Ingredients
In a large mixing bowl, combine:
- Gluten-free flour blend
- Salt
- Milk powder (if using)
Whisk everything together until evenly mixed.
This helps distribute the ingredients evenly throughout the batter.
Step 3: Combine Wet Ingredients
Add the following to the flour mixture:
- Activated yeast mixture
- Eggs
- Oil
- Apple cider vinegar
Mix using an electric mixer for about 3–4 minutes.
The batter should become smooth, thick, and sticky.
Remember, this is not traditional bread dough.
Do not add additional flour.
Step 4: Fill the Loaf Pan
Grease or line a 9×5-inch loaf pan with parchment paper.
Transfer the batter into the prepared pan.
Use a damp spatula to smooth the surface evenly.
This helps create an attractive loaf with an even top.
Step 5: Allow the Batter to Rise
Cover the loaf pan loosely with a clean kitchen towel.
Place it somewhere warm for 35–50 minutes.
The batter should increase noticeably in size but does not need to double.
Over-proofing may cause the bread to collapse during baking.
Step 6: Bake
Preheat the oven to 350°F (180°C).
Bake the bread for 45–55 minutes.
If the top browns too quickly, loosely cover it with aluminum foil after about 30 minutes.
The bread is fully baked when:
- The crust is golden brown.
- A toothpick inserted into the center comes out clean.
- The loaf sounds slightly hollow when tapped.
Step 7: Cool Completely
Remove the loaf from the oven.
Allow it to cool in the pan for 10 minutes.
Carefully transfer it to a wire rack.
Let the bread cool completely before slicing.
Although it may be tempting to cut into warm bread immediately, cooling allows the crumb to set properly and prevents a gummy texture.
Tips for Perfect Gluten-Free Bread
For the best results, keep these helpful tips in mind:
- Measure ingredients accurately.
- Use fresh yeast.
- Don’t skip the rising time.
- Keep the batter thick and sticky.
- Never add extra flour unless absolutely necessary.
- Always preheat the oven.
- Cool completely before slicing.
- Store properly to maintain freshness.
Common Mistakes to Avoid
Using Cold Water
Cold water slows yeast activity and prevents proper rising.
Adding Too Much Flour
Extra flour creates dense, heavy bread.
Over-Rising
Too much rising weakens the bread’s structure.
Cutting While Hot
Warm bread hasn’t fully set and may become gummy.
Using Expired Yeast
Old yeast won’t provide enough lift.
Storage Instructions
After cooling completely, store the loaf in an airtight container.
Room Temperature
Keeps fresh for up to one day.
Refrigerator
Store for 3–5 days.
Warm slices before serving for the best texture.
Freezer
Slice the bread before freezing.
Wrap slices individually or place parchment paper between slices.
Freeze for up to three months.
Toast directly from frozen.
Serving Suggestions
This homemade bread is incredibly versatile.
Enjoy it:
- Toasted with butter
- Spread with jam or honey
- As grilled cheese sandwiches
- With peanut butter
- For French toast
- Alongside soup
- With fresh salads
- Served with pasta
- As garlic bread
- With scrambled eggs for breakfast
Variations
Seeded Bread
Add sunflower seeds, pumpkin seeds, or sesame seeds.
Herb Bread
Mix dried rosemary, thyme, or oregano into the batter.
Cheese Bread
Stir shredded cheddar or Parmesan into the mixture.
Dairy-Free Version
Skip the milk powder and use dairy-free alternatives.
Slightly Sweet Bread
Increase the honey slightly and add cinnamon for breakfast toast.
Frequently Asked Questions
Can I make this bread without eggs?
Yes. Egg substitutes designed for baking can work, although the texture may be slightly less fluffy.
Can I use active dry yeast?
Yes. Allow it to activate fully before mixing with the other ingredients.
Why is my bread dense?
Dense bread is usually caused by inactive yeast, inaccurate measurements, or adding too much flour.
Why is the center gummy?
The loaf may need additional baking time or more cooling time before slicing.
Can I use another gluten-free flour?
Different gluten-free flours absorb moisture differently. A quality all-purpose gluten-free flour blend generally provides the most reliable results.
Nutrition Information (Approximate Per Slice)
- Calories: 165
- Carbohydrates: 28g
- Protein: 4g
- Fat: 4g
- Saturated Fat: 1g
- Fiber: 2g
- Sugar: 3g
- Sodium: 235mg
- Cholesterol: 31mg
- Calcium: 24mg
- Iron: 1.1mg