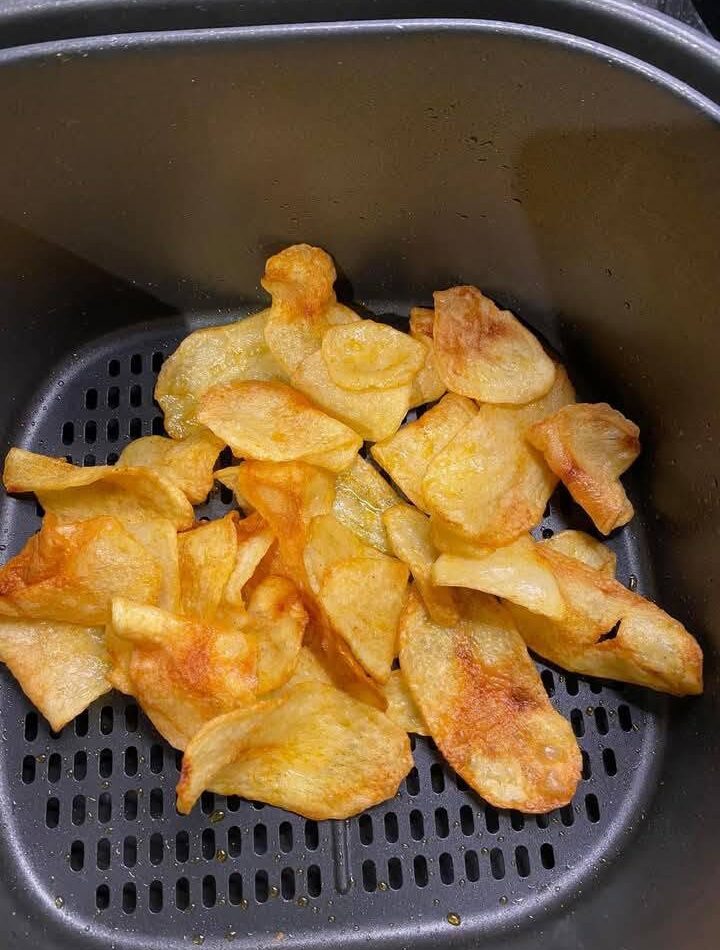
Few snacks are as universally loved as a crispy potato chip. The satisfying crunch, golden color, and simple potato flavor make chips a favorite for movie nights, family gatherings, lunchboxes, and everyday snacking. While store-bought potato chips are convenient, they often contain preservatives, artificial flavors, and large amounts of oil and salt. Making your own air fryer potato chips at home is an easy way to enjoy the same delicious crunch while using simple ingredients and controlling the seasoning to suit your taste.
This Air Fryer Potato Chips recipe transforms fresh potatoes into thin, crispy chips with only a small amount of oil. The air fryer circulates hot air around each slice, creating a light and crunchy texture without deep frying. With the right preparation—thin slicing, soaking to remove excess starch, drying thoroughly, and cooking in a single layer—you can achieve perfectly crisp chips every time.
Whether you prefer classic salted chips, smoky paprika, garlic herb, spicy chili, or cheesy Parmesan flavors, this recipe is easy to customize. Once you discover how simple homemade potato chips are to prepare, you may never want to buy packaged chips again.
Why You’ll Love This Recipe
Homemade air fryer potato chips are a healthier and fresher alternative to traditional fried chips. They require only a few pantry ingredients, cook quickly, and deliver a satisfying crunch with much less oil than deep-fried versions.
This recipe is:
- Crispy and golden
- Easy to prepare
- Made with simple ingredients
- Uses very little oil
- Ready in about 40 minutes
- Naturally vegetarian
- Free from artificial preservatives
- Easy to customize with different seasonings
- Perfect for snacks, parties, and lunchboxes
Preparation Time
- Prep Time: 20–25 minutes (including soaking)
- Cook Time: 12–15 minutes per batch
- Total Time: Approximately 40 minutes
- Servings: 2–3
Kitchen Equipment
Gather these basic kitchen tools before you begin:
- Air fryer
- Sharp knife or mandoline slicer
- Large mixing bowl
- Measuring spoons
- Kitchen towel or paper towels
- Tongs or spatula
- Cooling rack or serving plate
Ingredients
Main Ingredients
- 2–3 medium potatoes (Russet or Yukon Gold work best)
- 1–2 tablespoons olive oil or vegetable oil
- Salt, to taste
Optional Seasonings
- Freshly ground black pepper
- Garlic powder
- Onion powder
- Smoked paprika
- Chili powder
- Cayenne pepper
- Dried oregano
- Italian seasoning
- Dried thyme
- Parmesan cheese (added after cooking)
Choosing the Best Potatoes
The type of potato you choose affects the final texture.
Russet potatoes are one of the best choices because they contain plenty of starch, creating light, crispy chips with fluffy interiors.
Yukon Gold potatoes also work well, producing slightly richer flavor and a delicate golden color.
Red potatoes can be used, but they contain more moisture and may not become quite as crisp.
Step-by-Step Instructions
Step 1: Wash and Slice the Potatoes
Wash the potatoes thoroughly under cold running water to remove any dirt.
Peeling is completely optional.
Leaving the skin on gives the chips a rustic appearance and adds extra texture.
If you prefer classic smooth chips, peel the potatoes before slicing.
Using a mandoline slicer is highly recommended because it creates slices of equal thickness.
Aim for slices about 1–2 millimeters thick.
Uniform slices cook evenly, reducing the chance of some chips burning while others remain soft.
If using a knife, work carefully and try to keep every slice as consistent as possible.
Step 2: Remove Excess Starch
Place all the sliced potatoes into a large bowl filled with cold water.
Allow them to soak for 15–20 minutes.
This simple step removes excess surface starch, which helps prevent the slices from sticking together while encouraging crispiness.
After soaking, drain the potatoes completely.
Spread the slices onto clean kitchen towels or paper towels.
Pat every slice dry until no visible moisture remains.
This drying step is one of the most important parts of the recipe.
Any moisture left on the potatoes will create steam inside the air fryer, making the chips soft instead of crispy.
Step 3: Season the Potatoes
Transfer the completely dry potato slices into a clean mixing bowl.
Drizzle the oil over the slices.
Using your hands or tongs, gently toss until every slice has a light coating.
Avoid adding too much oil.
A thin coating helps the chips brown beautifully without becoming greasy.
Sprinkle with salt.
If desired, add seasonings such as:
- Garlic powder
- Smoked paprika
- Black pepper
- Chili powder
- Onion powder
- Italian seasoning
Toss gently once more until evenly coated.
Step 4: Preheat the Air Fryer
Set the air fryer to 360°F (180°C).
Allow it to preheat for 3–5 minutes.
Preheating helps the chips begin cooking immediately, resulting in a crispier texture.
Step 5: Arrange the Chips
Place the potato slices into the air fryer basket in a single layer.
Avoid overlapping.
Proper air circulation is essential for even cooking and maximum crispiness.
If necessary, cook in several batches rather than overcrowding the basket.
Although it takes slightly longer, the results are much better.
Step 6: Air Fry the Chips
Cook the potato slices at 360°F (180°C) for 12–15 minutes.
About halfway through cooking, carefully shake the basket or flip the chips using tongs.
As they cook, you’ll notice several changes:
- The edges begin curling.
- The color changes from pale to golden.
- The slices become firm.
- The aroma becomes rich and toasted.
During the final few minutes, watch the chips closely.
Because the slices are very thin, they can brown quickly.
Remove any chips that finish early while allowing thicker slices to cook a little longer.
Step 7: Cool Before Serving
Transfer the finished chips to a cooling rack or serving plate.
At first they may seem slightly soft.
Allow them to cool for 3–5 minutes.
During cooling, the remaining moisture escapes, making the chips even crispier.
Serve immediately for the freshest flavor and best crunch.
Flavor Variations
One of the greatest advantages of homemade chips is the ability to experiment with different seasonings.
Classic Salted Chips
Simply season with sea salt for a timeless flavor.
Smoky Paprika Chips
Add smoked paprika and black pepper before cooking.
This creates a rich barbecue-style flavor.
Garlic Herb Chips
Mix together:
- Garlic powder
- Onion powder
- Oregano
- Thyme
- Parsley
This combination makes an excellent savory snack.
Spicy Chili Chips
For those who enjoy heat, add:
- Chili powder
- Cayenne pepper
- Crushed red pepper flakes
Adjust the spice level to suit your preference.
Parmesan Chips
Immediately after cooking, sprinkle warm chips with grated Parmesan cheese.
The residual heat helps the cheese melt slightly onto the chips.
Vinegar Style Chips
Lightly mist the finished chips with vinegar and add a little extra salt for a tangy flavor inspired by classic salt-and-vinegar chips.
Helpful Tips for Perfect Potato Chips
1. Slice Evenly
Thin, even slices cook at the same rate and produce the best texture.
2. Always Soak
Removing starch is essential for crispy chips.
3. Dry Thoroughly
Moisture is the biggest obstacle to crisp chips.
4. Use Light Oil
A small amount of oil creates better browning without making the chips greasy.
5. Cook in Batches
Avoid overcrowding so hot air can circulate freely.
6. Watch Carefully
Thin slices can quickly change from perfectly golden to overcooked.
7. Cool Before Eating
Cooling finishes the crisping process.
Serving Suggestions
These homemade potato chips pair perfectly with many meals and dips.
Serve them with:
- Tomato ketchup
- Garlic mayonnaise
- Ranch dressing
- Cheese sauce
- Sour cream
- Yogurt dip
- Onion dip
- Guacamole
- Salsa
They’re also delicious alongside:
- Burgers
- Sandwiches
- Hot dogs
- Grilled chicken
- Wraps
- Picnic lunches
For parties, use them as the base for loaded chips topped with melted cheese, jalapeños, chopped tomatoes, green onions, and sour cream.
Storage Instructions
Homemade potato chips are best enjoyed fresh.
If you have leftovers, allow them to cool completely.
Store them in an airtight container at room temperature for 1–2 days.
Avoid refrigerating them, as moisture can soften the chips.
Reheating
If the chips lose some crispness, simply place them back into the air fryer at 320°F (160°C) for 1–2 minutes.
They will quickly become crunchy again.
Frequently Asked Questions
Can I make these without oil?
Yes. The chips will still cook, but they may be slightly less golden and crisp than those made with a light coating of oil.
Why are my chips soft?
Soft chips are usually caused by slices that are too thick, excess moisture, overcrowding, or insufficient cooking time.
Do I need to peel the potatoes?
No. Potato skins add texture, flavor, and extra nutrients.
Which potatoes are best?
Russet potatoes generally produce the crispiest chips, while Yukon Gold potatoes offer a buttery flavor and beautiful golden color.
Nutritional Information (Approximate Per Serving)
- Calories: 185
- Carbohydrates: 30 g
- Protein: 3 g
- Fat: 6 g
- Saturated Fat: 1 g
- Fiber: 3 g
- Sodium: Varies depending on added salt
- Potassium: 680 mg
Nutrition values are estimates and may vary based on ingredients and serving size.