A Decadent Chocolate Treat You Can Easily Make at Home
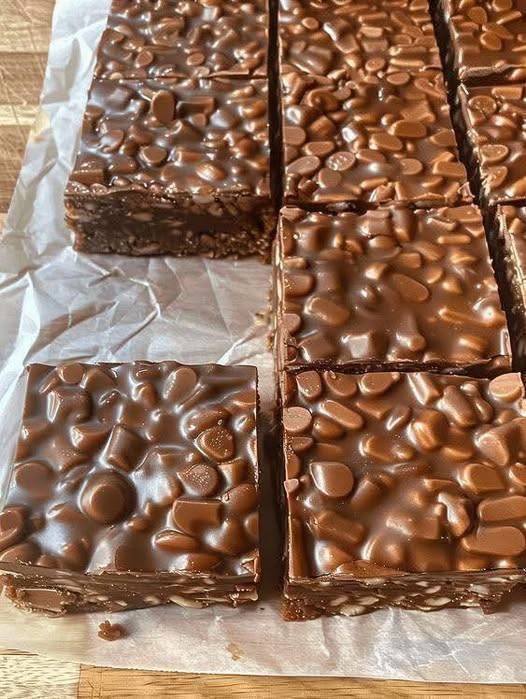
Chocolate desserts have a timeless charm that instantly brings comfort and happiness. Among the countless sweet treats loved around the world, homemade chocolate peanut crunch bars stand out because of their luxurious taste, irresistible texture, and effortless preparation. These rich chocolate bars combine silky melted chocolate with crunchy roasted peanuts and biscuit crumbs to create an indulgent dessert that tastes just like premium bakery confectionery.
What makes these bars truly special is the balance of flavors and textures in every bite. The smooth chocolate coating melts gently in your mouth while the roasted peanuts add a satisfying crunch. Crushed biscuits give the bars body and structure, creating a dense yet soft center that feels incredibly rich and delicious.
These easy no-bake chocolate peanut bars are ideal for festive gatherings, tea-time snacks, birthday celebrations, homemade gift boxes, or late-night dessert cravings. They look elegant enough for special occasions but are simple enough for beginner cooks to prepare without stress. You do not need advanced baking skills, complicated techniques, or expensive tools to make them successfully.
The glossy finish and crunchy nut-filled texture make these bars appear professionally made, yet the recipe requires only a few pantry-friendly ingredients. With a little melting, mixing, and chilling, you can prepare a dessert that rivals expensive chocolate shop treats.
If you enjoy quick homemade desserts, easy chocolate snacks, peanut candy bars, or no-bake sweets, this recipe will quickly become one of your favorite kitchen creations.
Why These Homemade Chocolate Peanut Bars Are So Popular
There are many reasons why chocolate peanut crunch bars are loved by dessert enthusiasts of all ages.
Simple and Beginner-Friendly
One of the biggest advantages of this recipe is its simplicity. Even if you have never made homemade desserts before, you can prepare these bars successfully. The process mainly involves melting, mixing, spreading, and chilling.
Unlike many traditional desserts, there is no need for baking, special decorating skills, or advanced cooking techniques.
Rich Chocolate Flavor
Chocolate lovers appreciate the deep cocoa richness in these bars. The melted chocolate creates a creamy and smooth texture that tastes luxurious and satisfying.
You can use milk chocolate for a sweeter flavor or dark chocolate for a richer and slightly bitter taste. Both options work beautifully.
Crunchy Nutty Texture
Roasted peanuts provide a delicious crunch that contrasts perfectly with the silky chocolate layer. Every bite contains crispy, nutty goodness that makes the bars addictive and enjoyable.
The peanuts also enhance the flavor by adding roasted, earthy notes that balance the sweetness.
Perfect for Special Occasions
These homemade dessert bars are ideal for:
- Eid gatherings
- Family celebrations
- Birthday parties
- Tea-time snacks
- School lunch treats
- Dessert platters
- Homemade edible gifts
- Holiday sweet trays
Because they look elegant and professional, they impress guests without requiring hours of work.
Easy to Customize
Another reason these bars are so popular is their versatility. You can easily personalize the recipe according to your preferences.
Popular additions include:
- Caramel drizzle
- Chopped almonds
- Pistachios
- Cashews
- Mini marshmallows
- White chocolate chips
- Dried fruits
- Coconut flakes
Each variation creates a completely new dessert experience.
Essential Ingredients for Chocolate Peanut Crunch Bars
The beauty of this recipe lies in its simple ingredient list. Most items are easily available in supermarkets and local grocery stores.
Chocolate
Chocolate is the main ingredient and forms the rich base of the bars.
You can use:
- Milk chocolate
- Dark chocolate
- Semi-sweet chocolate
- Compound chocolate
Good-quality chocolate produces a smoother texture and richer flavor.
Roasted Peanuts
Crunchy roasted peanuts add texture, flavor, and protein to the bars.
Salted peanuts can also be used if you enjoy a sweet-and-salty flavor combination.
Condensed Milk
Condensed milk gives the bars their creamy consistency and enhances sweetness naturally.
It also helps bind the ingredients together.
Butter
Butter improves the smoothness and shine of the melted chocolate mixture.
It creates a softer bite and richer mouthfeel.
Vanilla Essence
Vanilla essence adds warmth and depth to the flavor profile. Even a small amount enhances the aroma significantly.
Crushed Biscuits
Digestive biscuits or tea biscuits help create structure and body inside the bars.
They absorb some moisture from the chocolate mixture while adding subtle crunchiness.
How to Make Perfect Chocolate Peanut Bars at Home
Making these bars is surprisingly easy when you follow the process carefully.
Step 1 – Prepare Your Pan
Begin by lining a square tray or baking dish with parchment paper or butter paper.
This step prevents sticking and allows easy removal after chilling.
Lightly grease the paper with butter if needed.
Step 2 – Melt the Chocolate Properly
Place chopped chocolate and butter into a heatproof bowl.
You can melt the mixture using:
- A double boiler method
- Microwave heating in short intervals
Stir continuously until the chocolate becomes silky smooth and glossy.
Avoid overheating because burnt chocolate can become grainy.
Step 3 – Add Creamy Ingredients
Once the chocolate is fully melted, stir in condensed milk and vanilla essence.
Mix thoroughly until everything becomes smooth and evenly combined.
The condensed milk creates a rich fudgy consistency that makes the bars soft and creamy.
Step 4 – Mix in Peanuts and Biscuits
Add roasted peanuts and crushed biscuits into the chocolate mixture.
Fold everything together carefully until every peanut and biscuit crumb is coated evenly.
At this stage, you may also mix in optional ingredients such as:
- Chopped walnuts
- Almond pieces
- Mini marshmallows
- Chocolate chips
- Caramel bits
Step 5 – Spread into the Tray
Transfer the prepared mixture into the lined tray.
Use a spatula or spoon to spread it evenly into the corners.
Smooth the top surface carefully to create a polished bakery-style appearance.
For decoration, sprinkle extra peanuts or chocolate chips over the top.
Step 6 – Chill Until Firm
Place the tray inside the refrigerator for approximately 2–3 hours.
Proper chilling is important because it allows the bars to set firmly and hold their shape during slicing.
Avoid rushing this step.
Step 7 – Slice and Serve
Once fully chilled, remove the slab carefully using the parchment paper.
Cut into squares, rectangles, or bite-sized pieces using a sharp knife.
For cleaner slices, dip the knife in warm water and wipe dry before cutting.
Your homemade chocolate peanut crunch bars are now ready to enjoy.
Expert Tips for the Best Chocolate Peanut Bars
Use Premium Chocolate
The final flavor depends heavily on the quality of chocolate used.
Premium chocolate melts better, tastes richer, and creates a smoother finish.
Roast the Peanuts
Roasting enhances the nutty flavor and improves crunchiness.
Freshly roasted peanuts produce the best results.
Chill Thoroughly
Do not remove the bars too early from refrigeration.
Proper chilling ensures neat slicing and better texture.
Avoid Water Contact
Even a small amount of water can seize melted chocolate and ruin the texture.
Keep all bowls and utensils completely dry.
Use Warm Knife Technique
Warm knives create smooth professional-looking slices without cracking the chocolate.
Delicious Variations to Try
One of the best things about homemade chocolate bars is the freedom to experiment.
Caramel Peanut Bars
Add a thin layer of caramel sauce between the chocolate layers for a gooey surprise center.
Mixed Nut Chocolate Bars
Replace some peanuts with:
- Almonds
- Cashews
- Pistachios
- Walnuts
This creates a luxury-style mixed nut dessert.
Extra Biscuit Crunch Bars
Increase biscuit quantity for a firmer and crunchier texture.
This version tastes similar to chocolate wafer candy bars.
Dark Chocolate Nut Bars
Use dark chocolate for a bold cocoa flavor with less sweetness.
Perfect for adults who enjoy intense chocolate desserts.
Kids’ Fun Chocolate Bars
Mix colorful candy pieces or mini marshmallows into the chocolate mixture for a fun and playful dessert.
Best Ways to Serve Chocolate Peanut Bars
These bars taste wonderful on their own, but they also pair beautifully with beverages and desserts.
Popular serving ideas include:
- Hot coffee
- Chai tea
- Cold milk
- Vanilla ice cream
- Hot chocolate
- Whipped cream
- Milkshakes
They are perfect for dessert platters and festive sweet tables.
How to Store Homemade Chocolate Bars
Proper storage keeps the bars fresh and delicious for days.
Refrigerator Storage
Place the bars in an airtight container and refrigerate for up to 2 weeks.
Separate layers with parchment paper to prevent sticking.
Freezer Storage
You can freeze the bars for up to 2 months.
Allow them to thaw slightly before serving.
Because chocolate softens quickly in warm temperatures, refrigeration is recommended during hot weather.
Nutritional Benefits of Chocolate Peanut Bars
Although these bars are indulgent treats, they also contain some beneficial nutrients.
Peanuts Provide
- Healthy fats
- Plant protein
- Fiber
- Magnesium
Chocolate Contains
- Antioxidants
- Energy-boosting carbohydrates
- Mood-enhancing compounds
Condensed Milk Adds
- Calcium
- Creaminess
- Sweetness
Enjoying these bars occasionally can be part of a balanced lifestyle.
Final Words
Homemade chocolate peanut crunch bars are the perfect combination of simplicity, elegance, and rich flavor. Their glossy chocolate coating, crunchy roasted peanuts, and creamy texture make them completely irresistible.
This easy no-bake dessert recipe is ideal for beginners while still impressive enough for celebrations and special occasions. The ingredients are simple, the preparation is stress-free, and the results are absolutely delicious.
Whether you prepare them for family gatherings, festive occasions, tea-time snacks, or personal dessert cravings, these bars are guaranteed to become a favorite in your kitchen.
Once you experience the taste of homemade chocolate peanut bars, store-bought candy bars may never feel the same again.
So gather your ingredients, melt the chocolate, and enjoy creating these rich, crunchy, and luxurious homemade chocolate peanut crunch bars today.
Chocolate Peanut Crunch Bars Recipe
Ingredients
Main Ingredients
- 3 cups milk chocolate or dark chocolate
- 2 cups roasted peanuts
- 1/2 cup condensed milk
- 2 tablespoons butter
- 1 teaspoon vanilla essence
- 1 cup crushed digestive biscuits or tea biscuits
Optional Additions
- Caramel sauce
- Chopped almonds or walnuts
- Mini marshmallows
- Chocolate chips
Method
Step 1: Prepare the Pan
Line a square tray or dish with parchment paper and lightly grease it.
Step 2: Melt the Chocolate
Add chocolate and butter to a heatproof bowl. Melt using a microwave or double boiler until smooth and glossy.
Step 3: Add Creamy Ingredients
Mix in condensed milk and vanilla essence until fully combined.
Step 4: Add Crunch
Stir in roasted peanuts and crushed biscuits. Mix well so everything is coated evenly.
Step 5: Fill the Tray
Transfer the mixture into the prepared tray and spread evenly using a spatula.
Step 6: Chill
Refrigerate for 2–3 hours until completely firm.
Step 7: Slice and Serve
Remove from the tray, cut into bars or squares, and enjoy.
Storage
Store in an airtight container in the refrigerator for up to 2 weeks or freeze for up to 2 months.