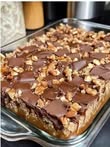
There is something incredibly comforting about homemade dessert bars layered with buttery crust, rich caramel, melted chocolate, and crunchy nuts. These decadent chocolate caramel bars combine bakery-style texture with classic homemade flavor, making them one of the best easy dessert recipes for holidays, parties, bake sales, family gatherings, or weekend sweet cravings. Every bite delivers a delicious balance of soft caramel, silky melted chocolate, crisp cookie-like crust, and optional crunchy pecans or walnuts.
These indulgent dessert squares are inspired by classic caramel chocolate slice bars often found in gourmet bakeries and homemade dessert collections. The recipe is simple enough for beginner bakers yet impressive enough to serve at celebrations. If you love chewy caramel desserts, chocolate layer bars, or buttery shortbread-style crusts, this recipe deserves a permanent place in your dessert collection.
One of the best things about these homemade caramel chocolate bars is how versatile they are. You can prepare them for birthdays, holiday cookie trays, Ramadan dessert platters, Eid gatherings, Christmas baking, tea parties, potlucks, or late-night sweet cravings. The combination of caramel and chocolate is timeless, rich, and universally loved.
The base of this dessert begins with a buttery baked crust made from pantry staples including all-purpose flour, melted butter, brown sugar, and a touch of salt. Once baked, the crust develops a delicate golden texture that supports the gooey filling beautifully. Unlike a traditional cookie crust, this layer stays slightly soft while still holding the bars together after chilling.
The caramel layer is where the magic truly begins. Warm caramel sauce blended with heavy cream creates a silky smooth filling that spreads beautifully over the crust. As it cools, the caramel thickens into a luscious layer that pairs perfectly with chocolate. Using heavy cream gives the caramel a more luxurious texture and prevents it from becoming overly firm after refrigeration.
Chocolate chunks scattered over the warm crust melt slightly when the caramel is poured over them, creating pockets of creamy chocolate throughout the bars. This technique produces a rich layered dessert with bakery-quality texture and flavor. Semi-sweet chocolate provides balanced sweetness, while milk chocolate creates a softer and creamier taste. Either option works beautifully depending on your personal preference.
Optional chopped pecans or walnuts add crunch and depth. Nuts help balance the sweetness of caramel and chocolate while adding a roasted flavor that makes these bars even more irresistible. Pecans provide a buttery richness, while walnuts create a slightly earthy flavor profile. If you enjoy texture in desserts, adding nuts is highly recommended.
The final topping consists of melted chocolate chips combined with a small amount of oil or butter for a glossy finish. This creates a smooth top layer that firms up beautifully in the refrigerator and gives the dessert a professional bakery appearance. Once chilled, the bars slice neatly into squares, making them perfect for serving and gifting.
These bars are ideal for make-ahead desserts because they actually taste better after chilling. Refrigeration allows the layers to set properly while intensifying the caramel and chocolate flavors. Many bakers prepare them a day in advance for the best texture and cleaner slicing.
For perfect dessert bars every time, using quality ingredients makes a noticeable difference. High-quality butter creates a richer crust, while premium chocolate improves overall flavor and melt consistency. Thick caramel sauce also helps achieve the ideal gooey texture. Homemade caramel sauce can be used for a deeper flavor, but store-bought caramel works wonderfully for convenience.
One reason this dessert recipe ranks among the best easy chocolate desserts is because it requires minimal baking skill. There is no complicated technique involved, and most of the process simply involves layering ingredients. Even beginner bakers can create stunning results with confidence.
To ensure the crust bakes evenly, press the dough firmly into the baking dish using the back of a spoon or the bottom of a measuring cup. Compacting the crust helps prevent crumbling after slicing. Baking until lightly golden ensures the base remains sturdy enough to support the caramel filling.
When warming the caramel and cream mixture, stir continuously over medium heat. Gentle heating prevents scorching and creates a silky consistency. The caramel should be warm and pourable but not boiling. Overheating can make the caramel too thick after chilling.
Melting chocolate slowly is another important step. Heating chocolate chips in short microwave intervals while stirring between each session helps avoid burning. Adding vegetable oil or butter gives the melted chocolate a smoother consistency and glossy appearance.
Chilling time is essential for achieving clean dessert bars. While it may be tempting to cut them early, allowing at least one to two hours in the refrigerator ensures the layers firm properly. For extra clean cuts, refrigerate slightly longer and use a sharp serrated knife wiped clean between slices.
These bars pair beautifully with coffee, tea, hot chocolate, or cold milk. They also work wonderfully as part of a dessert table alongside brownies, cookies, cheesecakes, and cupcakes. Because they are rich and satisfying, small squares often go a long way.
You can also customize the flavor while keeping the original structure intact. A pinch of sea salt sprinkled over the chocolate topping creates salted caramel chocolate bars with gourmet flavor. A splash of vanilla extract in the caramel mixture adds warmth and depth. Some bakers enjoy adding crushed toffee bits or mini chocolate chips for additional texture.
For special occasions, drizzle extra melted chocolate or caramel over the finished bars before serving. Decorative toppings can transform these simple dessert squares into elegant party treats. During holidays, festive sprinkles or edible gold dust can make them even more eye-catching.
Storage is simple and convenient. Keep the bars in an airtight container in the refrigerator for up to five days. The chilled texture keeps the caramel firm while maintaining freshness. These dessert bars can also be frozen for longer storage. Simply layer parchment paper between slices and freeze in a sealed container. Thaw in the refrigerator before serving.
Another reason these chocolate caramel dessert bars are so popular is their balance of textures. The crumbly crust, gooey caramel center, creamy melted chocolate, and optional nutty crunch create a satisfying bite every time. This contrast keeps the dessert exciting and prevents it from feeling overly heavy despite its richness.
Dessert lovers searching online often look for recipes such as easy caramel chocolate bars, layered dessert bars, homemade candy bar desserts, gooey caramel treats, chocolate chunk dessert squares, buttery shortbread bars, holiday dessert recipes, and no-fail baked sweets. This recipe fits perfectly into all of those categories because it combines simplicity with indulgent flavor.
If serving for parties or events, cut the bars into smaller bite-sized pieces for easy sharing. Their rich flavor means smaller portions are often ideal. You can also package them in decorative boxes or tins for homemade edible gifts during holidays and celebrations.
The aroma while baking is another reason these bars are unforgettable. The scent of butter, brown sugar, warm caramel, and melting chocolate fills the kitchen with bakery-style comfort. Few desserts create such an inviting atmosphere with so little effort.
This dessert also appeals to both children and adults. Kids love the gooey caramel and chocolate layers, while adults appreciate the buttery crust and balanced sweetness. It is the type of dessert that disappears quickly from serving trays because everyone reaches for seconds.
For best results, always allow the bars to cool slightly before adding the caramel layer. Pouring caramel over an extremely hot crust may soften the base too much. A brief cooling period helps maintain distinct layers while still allowing the chocolate chunks to melt perfectly.
You may also line the baking dish with parchment paper for easier removal. Leaving slight overhangs on the sides allows you to lift the entire slab out before slicing. This technique helps create cleaner edges and more professional-looking dessert squares.
These homemade chocolate caramel crunch bars offer bakery-quality flavor using simple ingredients found in most kitchens. The recipe combines classic comfort dessert elements into one unforgettable treat that works year-round. Whether you are baking for family, entertaining guests, preparing holiday sweets, or simply craving a rich chocolate dessert, these bars are guaranteed to satisfy.
From the buttery crust to the smooth caramel filling and glossy chocolate topping, every layer contributes to a dessert that feels luxurious yet approachable. Easy preparation, reliable results, and crowd-pleasing flavor make this recipe one of the best homemade dessert bar ideas for any occasion.
Part 2: Easy Step-by-Step Recipe
Gooey Chocolate Caramel Layer Bars
Preparation Time
- Prep Time: 20 minutes
- Baking Time: 15–18 minutes
- Chill Time: 1–2 hours
- Total Time: Approximately 2 hours 40 minutes
Yield
12–16 dessert bars
Ingredients
For the Buttery Base
- 1 cup melted unsalted butter
- 2 cups all-purpose flour
- 1/2 cup packed light brown sugar
- 1/2 teaspoon salt
For the Creamy Caramel Filling
- 1 cup caramel sauce (ready-made or homemade)
- 1/4 cup heavy cream
- 1 cup semi-sweet or milk chocolate chunks
- 1/2 cup chopped pecans or walnuts (optional)
For the Smooth Chocolate Topping
- 1 cup semi-sweet chocolate chips
- 1 tablespoon vegetable oil or melted butter
Method
Step 1: Prepare the Baking Dish
Preheat your oven to 350°F (175°C). Grease a 9×13-inch baking pan or line it with parchment paper for easier removal.
Step 2: Make the Crust
In a large mixing bowl, combine melted butter, flour, brown sugar, and salt. Stir until the mixture forms a soft crumbly dough.
Press the mixture evenly into the prepared baking dish to create the base layer.
Step 3: Bake the Base
Bake for 15–18 minutes or until the crust turns lightly golden around the edges. Remove from the oven and allow it to cool for about 5 minutes.
Step 4: Create the Caramel Mixture
In a small saucepan over medium heat, combine caramel sauce and heavy cream. Stir continuously until the mixture becomes smooth, creamy, and slightly thickened.
Step 5: Build the Layers
Scatter the chocolate chunks evenly across the warm crust.
Slowly pour the warm caramel mixture over the chocolate layer. If desired, sprinkle chopped pecans or walnuts on top for extra crunch and flavor.
Step 6: Add the Chocolate Finish
Place chocolate chips and vegetable oil (or butter) in a microwave-safe bowl. Heat in 30-second intervals, stirring after each interval until smooth and glossy.
Pour the melted chocolate over the caramel layer and spread evenly using a spatula.
Step 7: Chill Until Firm
Refrigerate the bars for at least 1–2 hours or until fully set.
Once chilled, cut into squares or bars and serve.
Helpful Baking Tips
- Use a serrated knife for neat, clean slices.
- Chill longer for firmer bars and easier cutting.
- Store leftovers in an airtight container in the refrigerator for up to 5 days.
- Sprinkle flaky sea salt on top for a gourmet salted caramel flavor.